There’s a particular kind of bad evening every wheeler knows. You’ve decided to do a trip. You and the crew have a weekend free. The map is open on three browser tabs. Notepad has a half-finished list of “stuff to bring.” Two of you are arguing about whether you can fit the Mojave Road in three days or if you need four. Someone’s checking gas station hours. Someone else just realized nobody’s packing a stove.
Two hours later, you have a vague plan that fits in your head but nowhere else.
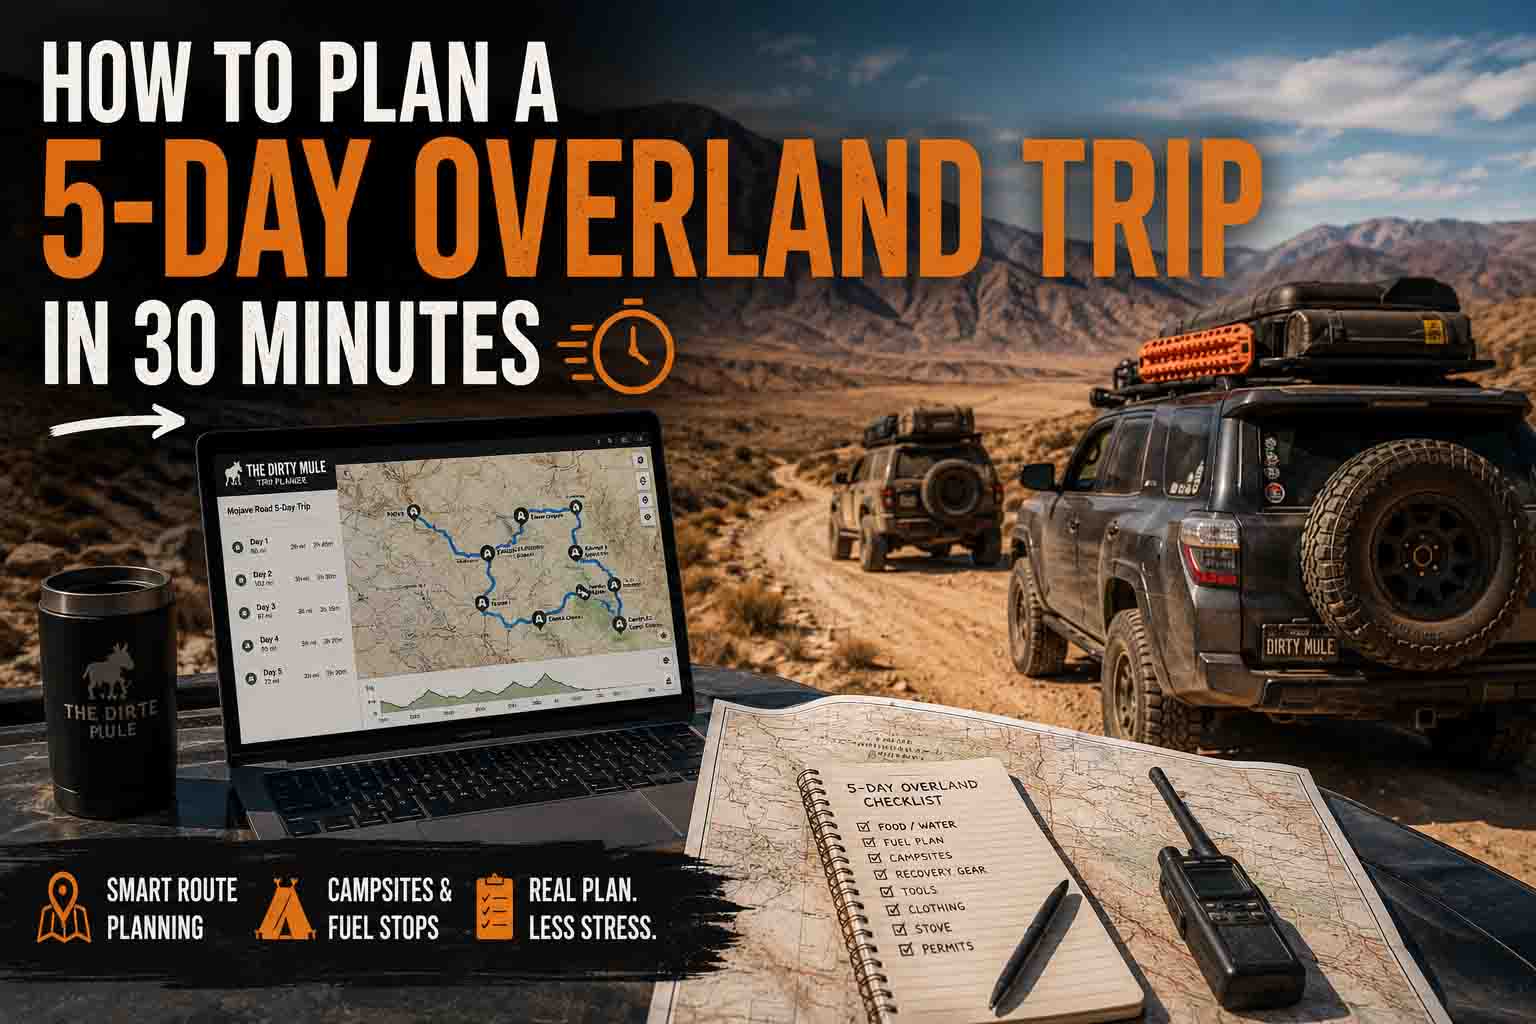
This is the post that gets you out of that loop. Below is how to plan an actual 5-day overland trip using The Dirty Mule’s trip planner — start to finish, real example, 30 minutes total. The example is the Mojave Road, but the steps work for any trip you’d put together: a weekend in the Rubicon, a long ramble through the Colorado high country, a Trans-America Trail section, whatever.
Open up /account/ and click New Trip in your Trips tab to follow along.
Minutes 0-5: Set the basics
Every trip needs a few things before it has anything else:
- A name (call it whatever; it’s just for you and your crew)
- Start and end dates
- A status (Planning is the default — leave it there for now)
- A short description (optional, but worth it — even one sentence about what kind of trip this is keeps your crew oriented)
For the example: “Mojave Road 5-Day Crossing — late October, four adults, two rigs, photo-heavy.”
That’s it. The trip exists. You haven’t done anything else and you already have a place to dump everything that follows. No more browser tabs. No more notepad.
Minutes 5-12: Add the trail, then the stops around it
The trip is empty until it has stops. Open the Itinerary tab and start adding them.
For a route like the Mojave Road, the anchor stop is the trail itself. Search the atlas for “Mojave Road” and add the Mojave Road trail page to your trip. That single entry carries the route’s full specs — 140 miles, dirt and sand surface, stock 4×4 minimum, October-April season, no cell, no fuel for the duration. Everything you need to brief the crew is on the trail page already.
Now add the places that hang off the route. Stops, viewpoints, history, anywhere you want the crew to know is part of the plan. Two iconic ones we already have in the atlas:
- The eastern terminus area, near where the Mojave Road meets the Colorado River, is right at the edge of Avi Kwa Ame National Monument (Spirit Mountain) — sacred ground to the Mojave, Chemehuevi, and Paiute, recently protected as a National Monument. Add it as your first stop after the trail anchor.
- About a quarter of the way west along the route sits Fort Piute Historic Site — a crumbling 1867 stone redoubt, one of the chain of outposts built to protect Mojave Road travelers from raids. Easy day-stop. Walk the foundations, read the interpretive signs, get back on the trail.
Other classic Mojave Road landmarks worth marking — Marl Springs, Soda Lake, the Penny Can Tree, Afton Canyon — aren’t in the atlas yet, but you can still drop them as custom POIs on the trip map (covered in Minutes 23-27). The trail itself plus the named places give you the spine; custom POIs fill in the rest.
There are three ways to add a stop to a trip:
- From the trip page itself, hit + Add stop and search the atlas
- From any trail or place page on the site, click Add to trip and pick this trip
- From the main atlas map, click any marker’s popup and use Add to trip there
For trips with several stops, the second method is fastest — you can browse the atlas at full size and add things as you find them, rather than searching from a small field on the trip page.
What this saves you from: manually typing locations into a document. The planner is pulling each stop from the live atlas, which means each one has its real coordinates, a working map link, condition reports (when other wheelers contribute them), and full descriptive context. Nothing to re-look-up later.
Minutes 12-18: Let the map sort the route
Switch to the trip’s map view. You’ll see your stops as numbered markers, with gold lines connecting them in the order they’re listed.
This is where the planner does something nontrivial: those gold lines aren’t straight as-the-crow-flies. They’re real road-following routes. The system pulls routing through OpenStreetMap data, so the line between two stops actually shows the roads you’d drive — including connecting paved sections you didn’t think about.
That means you can see things like:
- The drive from your second-to-last trail stop back to a fuel stop is 47 miles of mostly dirt, not the 12 miles of straight-line you’d assumed
- One of your “this is right next to that” stops actually requires a 90-minute detour because there’s no road between them
- A leg you thought was driveable shows as a dashed gray line because the routing engine couldn’t find a road connection at all (more on that in a sec)
Now reorder. On a desktop, drag the stops up and down by the handle on each card. On mobile, use the up/down buttons. As you reorder, the map redraws — so you can rearrange until the routing looks sane.
For the Mojave Road, the natural east-to-west order puts Avi Kwa Ame first (eastern terminus area) and Fort Piute second (about 20 miles in). If you decided to drive it west-to-east instead, just reverse — the planner doesn’t care.
About those dashed gray lines. If you see one between two stops, it means the routing engine couldn’t find a road between them. Either you have two stops on different continents (rare but real for trans-border trips), or one stop is placed somewhere with no road for a ferry distance away. For Mojave Road, you shouldn’t see any. If you do, drag one of the stops to reposition it.
Minutes 18-23: Build the crew checklist
If you’re going alone, skip this section. If you have a crew, this is where the planner earns its keep.
Open the Crew & Gear tab. Two parts:
Crew first. Invite the people coming on the trip. They get added either by username (if they’re on the site already) or email (the invite goes out and the link works whether or not they have an account yet). Anyone you can’t invite to the site itself — friend who doesn’t have an account, family member, etc. — gets added as a placeholder member. You give them a name; that’s it. They show up in the crew list and can have gear assigned to them, even though they can’t log in.
Then the checklist. This is the thing that, in a normal planning evening, gets emailed back and forth seventeen times until someone forgets they were bringing the stove.
Add items as you think of them. Standard categories: Cooking, Sleeping, Recovery, Lighting, Navigation, Tools. Don’t worry about getting everything — you’ll add more as the trip gets closer.
The trick: as you add items, assign them. Each item has an assignment chip on the right side. Click the ⋯ menu, pick “I’ll bring this” or “Assign to…” and pick a crew member (real or placeholder).
What this gets you, for free:
- A single place where the whole crew sees what’s covered and what isn’t
- An at-a-glance view of who’s carrying what (toggle the view to “By person”)
- Only the person assigned can check an item off as packed — so the source of truth stays with the actual packer
- Real-time updates: if Mike assigns himself the stove on Tuesday, you see it instantly
- A pre-departure “your items” callout box that shows each crew member their own list
Half an hour before you leave, every crew member can pull up their assigned list on their phone and check items off as they load the rig. No more “wait, did anyone grab the recovery strap?”
Minutes 23-27: Custom POIs and links
The atlas has trails and established places. Your trip probably has other stuff that isn’t in the atlas:
- The gas station you’re topping off at on the way in
- Specific obstacle locations you want everyone to know about (Soda Lake crossing point, the Penny Can Tree, the exact wash where you camped last time)
- A friend’s house you’re sleeping at the night before
- The Cottonwood Tank Trail closure article you want everyone to read
This is the Links & POIs tab.
POIs are points of interest you add directly to the trip map. Click the + POI button on the trip’s map, then click anywhere on the map. A small form pops up: title, icon (gas / camp / food / lodging / water / viewpoint / caution), and an optional note. Save. The pin sticks.
POIs are private to your trip. They don’t get added to the public atlas. So when you drop a POI for “Mike’s friend’s cabin” or “the spot where we camped last March,” nobody else sees it.
Links are URLs you want to keep handy. Add them with a label and a URL. Use cases: campsite reservation pages, current condition articles, GPS download files, anything you’d want to find again mid-trip.
For the Mojave Road specifically, custom POIs worth dropping: Marl Springs (water and Mojave Road history), the Soda Lake dry lake crossing, Afton Canyon at the western end, and any specific obstacles or campsites you want to revisit from a previous run.
Minutes 27-30: Final review and share
You’re almost done. Quick pass:
- Overview tab: read your description and make sure it still reflects the trip
- Itinerary tab: check the stop order one more time
- Map: verify there are no dashed gray lines you didn’t expect
- Crew & Gear: any unclaimed items in the checklist? Either claim them yourself, assign them to someone, or accept that they’re not coming
- Links & POIs: do the links work? (Click each one)
If you want a non-crew person to see the trip read-only (a family member who’s not coming but wants to know where you’ll be), generate a share link from the trip’s edit panel. Anyone with the link can view the trip without an account.
Done.
What just happened
You went from a vague plan in your head to:
- A trip page everyone can see
- An ordered itinerary with real road-following routing
- A shared checklist with assignments
- Custom POIs and references
- A way to share read-only
In 30 minutes.
The pre-trip emails that used to fly around between you and your crew — “are we still on for Friday?” “who’s bringing the propane?” “is the road open?” — those mostly stop happening. The trip page is the source of truth. Everyone has the same view. Updates ripple in real time.
Adapting this to your trip
Mojave Road has a clear east-west sequence and a single trail anchor. Your trip might be different shape:
- Weekend trail trip: maybe just one trail and a campsite. Skip the crew checklist if it’s just you. The full structure isn’t always necessary; the planner scales down as well as up.
- Multi-week ramble: switch the trip to day-grouped layout (under trip details). Each stop gets a day number, so a 21-day trip stays scannable.
- Group meet-up at a single trail: the crew and gear tabs are most of what you need. The itinerary might just be one entry.
- Out-and-back from home: build it as a normal trip — the routing engine handles loops fine.
The point isn’t to use every feature. It’s that the features are there when the trip needs them, and absent when it doesn’t.
A note on saving
The planner saves everything automatically as you edit. There’s no big “Save” button at the bottom of the trip page. Edit anything (stop dates, notes, status, descriptions) and it commits in the background within a second or two. Close the tab when you’re done. Come back tomorrow. Everything’s there.
The only thing that needs explicit action is sending crew invitations (they don’t go out until you click the invite button) and generating share links (only created when you ask for one).
Try it on a real trip
Pick one. A trip you’ve been talking about doing. One on your list. One you almost planned last month and never finished.
Open /account/ → Trips → New Trip and walk through this guide with it. The Mojave Road example was specific so you could follow the shape, but your trip is the one that matters.
When you get stuck, every section of the documentation has a “what does this button do” article. The trip-planning section in particular: Creating Your First Trip, Adding Stops, The Trip Map and Routing, Notification Settings.
The first trip takes the longest. Every one after that gets faster. By the third or fourth trip, you’ll spend more time picking the destination than planning the logistics.
Which is how it should be.